Techol - Latest Tips, Tricks, News and Productive Hacks

Includes Latest Tips, Tricks, News and Productive Hacks that you like to know.

Categories

FriendFeed

Follow Us

Subscribe In a Reader Follow Me on Twitter Follow My SMS

Enter your email address:

 Subscribe in a reader

Donation

Followers

Showing posts with label Windows. Show all posts

In this tutorial I will show you way how to install Windows 7 from USB drive. Before follow this tutorial, make sure you have at least a 4GB USB flash drive, Windows 7 installation DVD and WinToFlash software. why do I use this software, because this software is very easy to use and simple (no instalation require). WinToFlash software will help you to install windows from flash. something else need you check in your computer is your PC support boot-up from USB drive or not. you can see this option in computer bios.

Installing windows 7 from USB drive have some advantages are you don’t need to worry if the DVD drive cannot read the disc if there is any scratches on the Windows 7 installation DVD, it is more convenient to carry around your USB flash drive rather than a DVD disc, you still able to install Windows 7 Althought the PC doesn’t even have a CD/DVD drive.

Creating Windows 7 instalation USB drive

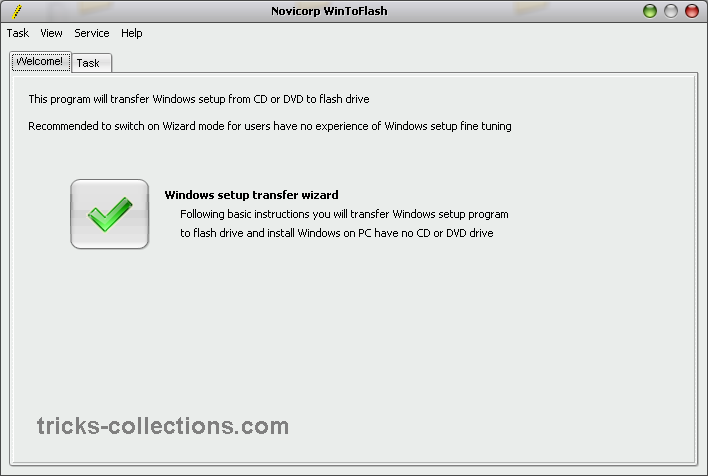
There is a software called WinToFlash that does everything above automatically. All you need to do is run the program, set the location of the Windows 7 installation disc and the destination of your USB flash drive.

  1. Download WinToFlash software. I recommend to use the latst version.
  2. Extract download file and then go to ectracted folder. run WinToFlash.exe then Click the “big check button” to start Windows setup transfer wizard.
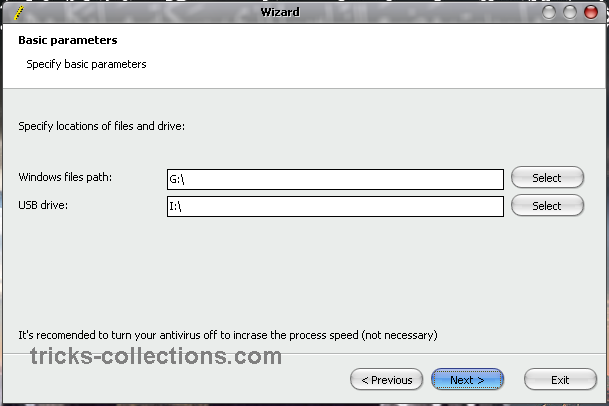
  3. Click Next then Specify the locations of Windows 7 instalation DVD and USB drive then click Next (The Windows 7 instalation DVD is the drive letter of your Windows 7 DVD drive and the USB drive is the drive letter of your USB flash drive)
  4. Select “I Accepted the terms of the license agreement” and click Continue.
  5. Click OK to start formatting your USB flash drive and the files will be automatically transferred from Windows 7 instalations DVD to USB flash drive.
  6. Click Next when finished copying.

Now How to Install Windows 7 from USB drive

Boot up the computer from USB flash drive. You will need to go into BIOS setup and set to boot from flash devices (USB device). If you got it right, the Windows 7 installation should load from your USB flash drive and install the Windows 7 like installing windows 7 from DVD drive.

Related Posts with Thumbnails

As a computer tech guy, two things that I find very important is the speed of solving a computer problem and also convenience. I don’t want to be wasting the whole day trying to solve one problem and the customer sees me as unprofessional. Convenience in a way I don’t want to tire myself in opening up dirty and dusty computer case, swapping hard drives and etc.

Very frequently I had to reinstall Windows for people. One very common annoying problem that I always face is the user lost his license sticker and I had to spend more time in retrieving the genuine Windows product key. There are a few ways to do it and most of them involves me having access to another working computer. For example, taking out the hard drive and fix it to a working machine, load the registry and retrieve the product key. Or I can boot up PCRegedit, load the registry and then decrypt the key from a working computer. All those steps are very time consuming and troublesome.

I tried very hard to look for a linux live CD that can retrieve the license key but I couldn’t find one. But here’s my opinion on the simplest and most convenient way to retrieve XP or Vista product key from an unbootable machine.

All I need to do is set up a UBCD4Win livecd, boot up the computer with it and run either Joshua’s Key Reader or Keyfinder. Setting up UBCD4Win could take a while, so here’s a guide on how to create your UBCD4Win livecd.

1. Download UBCD4Win (250+MB) and install it on your computer.

2. Run UBCD4Win.

3. You need to select the source at UBCD4Win. Insert Windows XP installation disc and select your CD drive. If you don’t have Windows XP installation disc but your manufacturer provides a i386 folder in your C drive, then select C:\i386

4. Insert a blank CD, select Burn to CD/DVD and click Build. The whole process should take a while so go have a coffee.

Now to recover Windows product key, all you need to do is boot up the unbootable computer with UBCD4Win. Follow the instructions until you get to a part where it looks like Windows. Go to Start > Programs > System Information > Info. and Diag. Tools > You can either use Joshua’s Key Reader or Keyfinder

A. If you run Keyfinder, go to Tools > Load Hive… and select the Windows folder which is normally at C:\Windows and the genuine Windows Key will be display at the right pane.
keyfinder recover windows key

B. If you run Joshua’s Key Reader, click the Read Remote Key button. Same thing as above, select Windows folder which is normally at C:\Windows. The Windows Product Key will be shown.
joshua xp key reader

This method confirm to work on Windows XP and Vista 32-bit because I’ve tested it. See, all it took is one CD to do the job. Don’t need to have access on another working computer to decrypt the ProductID, or the hassle of taking out the hard drive and fixing on another computer. I noticed something weird on my Acer laptop running Windows Vista. The product key that is retrieved from the registry hive is different from the license sticker at the bottom of the laptop and I am very sure that the Vista is installed from the recovery partition. Anybody knows anything about this?

Related Posts with Thumbnails

WinToFlash is free to use software which lets you copy windows setup files from windows to your USB flash drive, this application can really come handy when you want to install an operating system like windows 7 or any other windows version on your netbook.

It lets you transfer windows xp, windows 2003, Windows Vista, Windows 2008, Windows 7 setup from CD or DVD to your Flash drive.

Download WinToFlash


Related Posts with Thumbnails

Tired of trying breaking into that Linux box which pesks you with its password screen ? Well,your day is saved when Kon Boot comes to rescue . Apart from the stupid logo,Kon-Boot is an fantastic prototype software which can change contents of a Linux kernel and Windows kernel while booting.It will you to log into a Linux system as “root” user without even typing the correct password or to elevate privileges from current user to root. For Windows systems it allows to enter any password protected profile without any knowledge of the password.Entire Kon-Boot was written in pure x86 assembly in TASM 4.0

Kon boot was mainly created for Ubuntu,but now it supports more Linux distributions. Kon Boot can crack an array of Windows and Linux operating systems ranging from Windows XP to even Windows 7,which makes it one of the first tools to break Windows 7 passwords.On the Linux from it supports Gentoo,Ubuntu,Debian and Fedora flavors.

Here is how you can Hack Linux Passwords using Kon-Boot

  1. Boot with Kon-boot CD or Floppy

  2. When Linux is fully booted go to the console mode

  3. Type 'kon-usr' as login, if it works you should be now in the system

  4. Remember to restore the system when you are leaving, you can do this by typing 'kon-fix' as login again.

Here is a Sample Console output of what it will look like -

Ubuntu 8.04 torpeda tty1

torpeda login: kon-usr

# id

uid=0(root) gid=0(root)

# whoami

root

Here is how you can Hack Windows Passwords using Kon-Boot

No special usage instructions are required for Windows users, just boot from Kon-Boot CD/Floppy, select your profile and put any password you want. You lost your password? Now it doesn't matter at all.

You can Download Kon-Boot from here -

Floppy Image – FD0-konboot-v1.1-2in1.zip

CD ISO Image – CD-konboot-v1.1-2in1.zip

Related Posts with Thumbnails

Before you spend a dime on security, there are many precautions you can take that will protect you against the most common threats.

1. Check Windows Update and Office Update regularly (http://office.microsoft.com/productupdates); have your Office CD ready. Windows Me, 2000, and XP users can configure automatic updates. Click on the Automatic Updates tab in the System control panel and choose the appropriate options.

2. Install a personal firewall. Both SyGate (www.sygate.com) and ZoneAlarm (www.zonelabs.com) offer free versions.

3. Install a free spyware blocker. Our Editors' Choice ("Spyware," April 22) was SpyBot Search & Destroy (http://security.kolla.de). SpyBot is also paranoid and ruthless in hunting out tracking cookies.

4. Block pop-up spam messages in Windows NT, 2000, or XP by disabling the Windows Messenger service (this is unrelated to the instant messaging program). Open Control Panel | Administrative Tools | Services and you'll see Messenger. Right-click and go to Properties. Set Start-up Type to Disabled and press the Stop button. Bye-bye, spam pop-ups! Any good firewall will also stop them.

5. Use strong passwords and change them periodically. Passwords should have at least seven characters; use letters and numbers and have at least one symbol. A decent example would be f8izKro@l. This will make it much harder for anyone to gain access to your accounts.

6. If you're using Outlook or Outlook Express, use the current version or one with the Outlook Security Update installed. The update and current versions patch numerous vulnerabilities.

7. Buy antivirus software and keep it up to date. If you're not willing to pay, try Grisoft AVG Free Edition (Grisoft Inc., www.grisoft.com). And doublecheck your AV with the free, online-only scanners available at www.pandasoftware.com/activescan and http://housecall.trendmicro.com.

8. If you have a wireless network, turn on the security features: Use MAC filtering, turn off SSID broadcast, and even use WEP with the biggest key you can get. For more, check out our wireless section or see the expanded coverage in Your Unwired World in our next issue.

9. Join a respectable e-mail security list, such as the one found at our own Security Supersite at http://security.ziffdavis.com, so that you learn about emerging threats quickly and can take proper precautions.

10. Be skeptical of things on the Internet. Don't assume that e-mail "From:" a particular person is actually from that person until you have further reason to believe it's that person. Don't assume that an attachment is what it says it is. Don't give out your password to anyone, even if that person claims to be from "support."

Related Posts with Thumbnails

Can't find what You're looking for? Try Google Search.

Translation by Google

Popular Posts

Recent Posts

Earn Money By Blog Reviews

PayPerPost
ss_blog_claim=912fac891e81c0039da80c7868c8006f ss_blog_claim=912fac891e81c0039da80c7868c8006f